Wednesday, May 21, 2008

Behind The Scenes

Wash Day!

Today's weather seemed perfect to get a start on the container gardening. Before I plant I like to empty the dirt out and wash out the containers. There are quite a few planters. Not all will be planted this year, some will be stored for next year. Sitting out in the elements they only last a few years. I keep collecting them as I can so that I will have a good supply when I need it. Planning ahead means I will be able to continue to grow what I need now, and in the years to come.

Many of these containers will live on the deck, outside the kitchen. Others will be set in the garden and possibly be placed around the yard. I hope to put some pretty flowers into some of them.

I set up in the driveway for my big "wash day". I set up two saw horses and set a Rubbermaid watering trough on top, it saves my back quite a bit. After gathering my rags, scrub brushes, and green Scotch Brite pads, I fill it with the hose, add bleach and wearing two pair of rubber gloves get to scrubbing! (a lightweight neoprene pair inside of a heavier latex pair) I try to wash the containers every year before replanting them to make sure they are not harboring any bugs, viruses, fungus's, nothing that might put this years plants at risk, that might persist in the corners of a plastic or clay pot.

Once the pots were clean, I washed the rocks you see laying on the blue tarp. They used to cover the flower filled area there, near the window. This year, once they are all cleaned up, they will line the bottoms of various containers. No longer "decorative", they will now be put to practical uses.

How Things Look In late May

I did a bit of this and that around the garden and yard today, nothing worth lengthy description. So, I thought it might be a good day to take a couple of photo's to show progress or...possible failure. I like to think of all of it as learning experiences. The more I do this the more I learn what to do and what not to do.

An Upside Down Tomato Getting Comfortable
If you look closely, you see the tomato is doing pretty well, beginning to look up and curl toward the sun. Look even closer, and you will see the side planting of basil. It does not looked nearly as happy but it does seem like it may settle in and do reasonably well.


A Comparison Of Side Planted Basil Plants

The plant in the foreground looks like it will survive and maybe even thrive. The basil in the background is barely showing any life. I'm not sure what the difference is between the two plantings. I know that we have had a lot of rain recently so, it may be more surprising that the one plant is doing so well. Basil does not like to be wet all the time.

I still have not replaced the watering reservoirs in these upside down planters. I hope to get more 1 liter bottles to use soon.

The "New" Strawberry Pyramid Is Filled With Flowers
The Strawberry Pyramids are growing nicely, making lots of flowers. There are quite a few small immature berries already in place, with more to come along soon! I am hoping to get enough fruit to put some up this year. The pyramid above is the one I put in last year (2007) These are the berries I plan to catch runners from and transfer into the other pyramid later this season. I think the fruit in this pyramid is superior in size, flavor and vigor. I will be sure of the flavor aspect once this crop is ripe enough to eat. I check them daily.


Here Is The Original Pyramid

This pyramid holds two different species of strawberry, one is a June bearer and one an everbearer. I am not impressed with the vigor of either these plants. I hope the plants in the other pyramid (given to me thru Freecycle) live up to my expectations. So I can replant both pyramids with the same fruit.

I hope to build a new "cage" for the "new" pyuramid soon and I will explain the process and take photo's along the build so that others can see how I make a cage.

It seems a gardener's work is never finished. Once these finish their fruit they will send out runners. I plan to catch those and transplant some of them others, I plan to give away on Freecycle. Then, I need to renovate the pyramids. They need to have some dirt replaced, some food, and maybe some pruning later in the season.

Thursday, May 15, 2008

Progess as Planned

Waiting Patiently
First thing, I checked on my seedlings and gave them all a drink! They continue to sit and wait patiently. The collection grows regularly, every trip to the nursery or local shopping center parking lot (they have a temporary plant sales place set up there) results in two or three new plants. Next year, I will plan it all out in advance and grow my own seedlings again, not this year. Buying seedlings is expensive business, though I admit, I enjoy the search and the discovery of new things. Yesterday I bought a penny royal plant and a Stevia plant, nice additions to the herb garden.

Not Done Yet
Mid-morning we ran out of vermiculite and had to quit our soil mixing work. Before I left for the nursery for more, I took a few pictures to document the progress we had made.

This picture, taken from the garden gate, shows the progress and the two frames that I have sitting in wait, covered to keep those weeds from growing too fast until I can get to them.

Coarse Vermiculite
I made lunch and then, headed for the Nursery, Merrifield (Fair Oaks Location) in Northern Virginia. This was the first time I have been able to find coarse vermiculite. Third year of SFG'ing, three must be the charm. Since it was so difficult for me to find this product. I decided to take photo's of the bags that it came in and to share it with others here. I hope it's helpful to some of us. The Gentleman at the nursery tells me that they carry it...when they can get it. Seems it is difficult to get so, they buy it when it's available. Call first! Make sure you are specific when asking about it, this particular nursery had 3 different packages of vermiculite, only a few bags of the coarse variety, even less after I bought mine. The bags were about 1/2 the size of the usual 4 cu. ft. bags of medium vermiculite I had bought in the past. Special thanks for the info about Merrifield Garden Center availability to, Detrick from the SFG list!

Close up! (the ink is deep green)
Now that we have more material, it's back to work!

We finished filling the frames today. The garden area (and beyond) are all trimmed up. Next will be the installation of weed blocking tiles around each frame. That "should" keep the weeds from encroaching on the boxes/frames and keep the string trimmer from beating up the outsides of the boxes.

SFG, End Of The Day From Up Above

Raspberries!
In the far back corner of the SFG, lives my small, temporary patch of raspberries. I decided a "close up" without all the surrounding junk in it was in order. Though mostly neglected, they seem to be doing very well. I intend to build out their frame/box once we get the big old platform torn out of there, later this season. It is hard to be patient when I can see such progress being made.

Upside Down From Up Above
Here is one more photo of the Upside Down Garden, not much change, a few seeds planted in the small boxes on the ground, one side is hyacinth beans and one is nasturtiums. I can hardly wait to watch them climb up the side of the frame.

The weather folks are calling for rain. Time to take another break from the outdoor work and get back to work indoors for a day. Sourdough bread is on the list of chores today.

Hope to get back to work on the garden this weekend, if not before then.

Tuesday, May 13, 2008

A little bit of this and that, Updates

These first two pictures are for my friends, Dorothy (who sent me the seeds of friendship) and my friend vi, who loves all things lavender.

I met Dorothy online, she lives across the country from me, thousands of miles away. I mentioned that I loved violets and wished I had some. The next thing I knew there were packages of seeds for viola's (johnny jump ups) in my mailbox! I planted them and they grew! And they grew some more. And, they smiled at me all winter and they spread their seeds everywhere! I have them in the cracks of the sidewalk, in pots that I had not gotten to replanting yet and, little surprises popping up throughout my lawn. They are peeking out everywhere, what lovely little surprises!

Seeds Of Friendship

Seeds Of Freindship, Popping Up Everywhere!

And now for the updates:

Here is a photo of the chain and hook I use to pot the upside down planters. It sure makes the job easier! (Sorry I missed putting it into the earlier entry)


I bought a new Concord Grape Vine today. I bought a dormant root plant earlier from one of the big Home Centers but it just didn't make it. I was so determined to establish a grape vine this year that I purchased another. this one looks hale and happy, hope I can manage to keep it that way! If you look (photo below) back in the far corner (top of the photo) you can see that we have finished filling one SFG frame with soil. We did it the other day, just before the rain started. (I think we must have gotten 5 inches of rain since then, maybe more. I feel sure that the drought restrictions have been or will soon be lifted here. I was glad we got a break in the weather so we could get some more progress made today.
Tonight we emptied out the last of the bags of mulch we had stored, out of the last unfinished SFG frame, turned it over and attached the chicken wire to the bottom. We are preparing to finish filling the SFG frames tomorrow.
We trimmed the weeds down low on the established frames. I then cut cardboard to fit over the tops of the frames, over the the weeds. I am hoping to keep the weed development down until I can get back to them to weed them out. I am so busy building the rest that I was afraid the weeds would just get away from me if I didn't do something.

And lastly, here is the most recent photo of the Upside Down Garden. I added the growing boxes at either end today. They will be planted with beans that I plan to have grow up the "A frame" sides of the Garden Frame.

Tomorrow we will lay the cardboard under the last frame and fill them all with Mel's Mix. Then I will begin placing the newspaper and tiles around the new frames. Preparation is all I can think about these days and the work I need to do to make these frames as low maintenance as possible throughout the coming growing season.

I'll be very busy tomorrow, "making hay while the sun shines" you know. I'll be doing my best to take a few pictures of the progress between all the work. I might not get to the photo's until the end of the work day.

Thanks for stopping by and happy gardening!

How To Build An Upside Down Tomato Planter PART II

MAKING THE RESERVOIR

This is a new "design" for us. We managed the watering of the upside down garden very differently last year. We experienced drought conditions last year. The drought and the fact that we are expanding the garden so much this year has made us rethink our watering practices. It has always been important to us, to not waste water, we are now more conscious about water use than ever before. Along with the conservation of water, I am also working to mange my time and personal energy resources well. I am hopeful that by the end of the season, I will have a system in place for all the gardens that manages all my resources well and is very simple. Simple enough that I could easily leave the care of my garden to some one else with little explanation or worry. For the Upside Down Garden, this means integrated water reservoirs.

Stay tuned for future water saving measures, posted in future blog entries.

My Reservoir Piercing Tool


I use a "T" pin, any pin will do I'm sure, I just had these on hand and I find them easy to get a good grip on them so, I chose one as my piercing/perforating tool.


I chose one liter bottles this year because I wanted to bury them within the planters. One liter should not displace too much soil and it should give the plants enough to drink. My goal is to give them just enough to drink and to not have much drainage out the bottom. I am concerned about losing precious nutrients along with the water as it leaks thru the bottom of my planters. Since I don't rely on commercial fertilizers, this is very important to me.


I am using any plastic one liter containers I can get my hands on, soda bottles, water bottles and milk bottles, all are well cleaned and used this year.

First I pierced holes in the bottom of the containers, on this soda bottle I pierced all five areas that would be low lying once installed.

Next time, I will only pierce one hole. My goal is for the water to trickle out, five holes are just too many and the water is flowing too quickly.


also pierced a few holes in the sides, next time I will only pierce one on each of 2 sides. The water is flowing much too freely. I am hopeful that I can slow the flow in such a way that it will soak the planting soil without losing much thru the bottom.

I did leave the caps on the bottles on purpose, they will be used all the time once the planters are finished. Now that the bottles are perforated, I set them inside the container, grab a couple of plants and head for the potting bench where I have a hook with a length of chain attached to hang the empty pot from .

This is the tomato I chose, it is quite well developed so, I will prune the bottom section of the plant before I pot it.
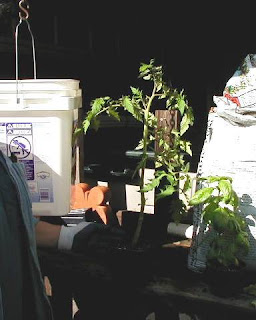


Here is the plant all pruned and ready to be planted. I will bury the plant up to where the leaves are now growing, that stem will sprout a wonderful network of roots, giving it lots of roots to pull in the water and nutrient it needs as the season wears on.
Remove the plant from it's small pot...


Remove most of the soil, the root ball has to be small enough to fit thru the hole you made on the bottom of the pot. It will not injure the plant if a few of the roots get trimmed so, don;t worry too much.


Put one hand inside the pot to grab the root ball once it fits thru from the outside, while you gently coax the root ball and stem thru from the bottom, allowing the top of the plant to hang upside down.

Be gentle and coax the roots thru. If you removed enough of the soil and trimmed the roots a bit (scissors can be used) it should fit thru. I always do this with seedlings, these are the largest seedlings I have ever used for the upside down planters and they fit with a little patience.


Once you get the root ball thru the bottom, you continue to support the plant from the bottom with one hand.
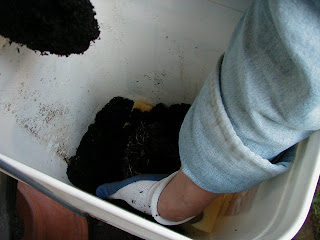

Now, while contiuing to gently support the root ball in your hand, begin to add dirt to cover the bottom of the planter with the other (unless you have a helper, which can be a very good thing!). Just cover the bottom with a few inches of soil, don't tamp the soil down, you want it to remain rather loose and airy at this point, it will all settle in naturally around the plant, it's roots etc. Make sure to put in enough soil to support the plant enough that you can let go of it and not so high that it gets in the way of placing the next plant in thru the side hole.


This is just another picture of my gloved hand supporting the root ball, taken from another angle, I think it is very hard to see what is going on inside the bucket at this point. I hope offering a second picture, from a different angle might help.

Next set the resevoir into the bucket, on top of the dirt. Make sure the top of the bottle is above the top of the bucket, you want the shoulder of the bottle exposed a bit (not much) so you can see the water level when you fill it. You may have to dig down a bit to place it correctly, just be careful, use your hand so you don't damage the plant(s) at all.

Now begin to fill with your soil around the bottle, filling up the bucket to near the very top. Please remember to not tamp down the soil, let it settle on it's own, just fill for now.

Here is a bucket I consider full, I can still see thru the shoulders of the bottle when I fill it with water. After filling it with water, I replace the cap. I hope this will slow the flow of the water from the filled bottle.


Finally, there is one pot, with an upside down tomato plant, hanging upside down, in my Upside Down Garden!

Stay tuned for, PART III


Monday, May 12, 2008

How to build an Upside Down Tomato Planter PART I

Many of you have asked me how I make the upside down planters so, here it is,

"My Photo Essay"
I hope you like it and find it helpful!

Lay Out Plan
Here is the almost finished, Upside Down Garden Frame. It is sitting on blocks, and has some heavy screw eyes installed for hanging plants. We bent the screw eyes to open them, ever so slightly, making it just possible to slip the wire bale (wire handles) thru them. This will keep the buckets hanging up all summer and into the fall. There are plans to add an "east wing" and a "west wing" to the frame but, I don't expect to get to that for another week or two. If you will, imagine with me for a moment two boards attached to the top brace of the frame on each side of the frame, these boards will extend out and have a hook on each end. We will hang one bucket from each end of that new "extension". It may help to look at the buckets on the ground, they are in the approximate locations that the new buckets be. (Of course, they will not be on the ground. Use your imagination!) They will hang from the "wings/arms, elevated a bit higher than the buckets that are already in place and hanging. I promise to update the blog with our progress on the "build out" on this frame.

If all goes well I hope be able to use this structure as a temporary green house next year, in the early spring 2009. I may even be able extend my tomato season this autumn.

HOW I BUILT THE UPSIDE DOWN PLANTERS

Preparing The Buckets

Using a 2 1/2 inch hole saw in a standard drill, cut a hole thru the center of the bottom. There is often a dimple that is recessed in the bottom which makes it very easy to center your drill.


I use both cat litter buckets and 5 gallon buckets. Whichever I can get free or cheap. I make sure to only use buckets that are new or have not held any nasty chemicals, etc.

Using an 1/8 inch drill, make some holes around the perimeter of the bucket bottom. These will aid in letting out extra water from serious rainfall that might tend to water log the plants if it took too long for it to escape. I like to have good drainage available if I need it.

Adding An Extra Growing Space


This year we decided to add an additional plant to some of our containers so, we drilled additional hole in the side of some of the buckets. We made the new holes, the same size as the bottom hole, using the 2 1/2 inch hole saw again.
We hope to plant suitable tomato companions in this extra side space. So far, I have planted basil in the sides of two of the planters. I have not decided what to grow in this space in the other containers. I'll decide which plants to use as I fill each bucket.


Keeping The Dirt In the Pot

Looking around, I found that different sites recommend several different solutions for making sure the dirt stays in the container. Some sites do not mention it at all. Since the hole is on the bottom of the planter and there are times the water runs thru the pot, I feel a need to insure that I don't lose soil thru that bottom space. I suppose, that in time, the roots would really help block the soil from exiting but, in the meantime, what to do? I choose to use foam. It has lots of flexibility, is not difficult to handle and it is readily available used, free or cheap! Last year I used some from old seat cushions that had worn fabric (the sort that tie onto kitchen chairs). This year I found this twin size roll of "egg crate" foam for $1, it is working well. I imagine it will take years to use it all. The foam may not last years as it is already well aged.


Cutting The Foam To Fit
I just cut a rectangle a little larger than the bottom of the pot. I then cut that piece into two pieces, one to cover the bottom hole and one to cover the side (the foam really helps provide additional support for the side growing plant until it gets it's roots set)


Marking And Cutting The Foam


The front piece of foam fits nicely behind the indent that is in the bottom of these buckets. It makes a nice support, holdinging it against the side wall of the bucket.


Holding the foam inside with one hand, mark the foam from the outside with a pen at a diagonal. The line/cut area is best cut in this direction (see next picture for specifics)

Note that the line is aligned from corner to corner. If marked and cut this way, it allows for extra "finger room" when positioning the plant later.


Now, the cut can be made with scissors or a sharp knife


Here is the final hole, ready to accommodate the plants roots.
Covering the bottom hole:
The second piece of foam, cut earlier, should simply lay over the bottom hole. It does not need to cover the bottom of the bucket/pot it only needs to cover the hole with some extra fabric around the bottom of the pot.

Mark and cut on the diagonal, the same as the side piece.

Now the pot is prepared, I will turn my attention to preparing the water resevoir.

See Part II,
Making The Reservoir

Saturday, May 10, 2008

Update on Upside Down Garden

Here is the update on the upside down garden. I hope to add more later today, if the rain will hold off long enough we may get some of the hardware attached and maybe even a few of the tomatoes planted. I have my fingers crossed that we will accomplish some progress on our gardens this weekend.

Upside down frame, almost ready for "Planting"
If you are following the progress, you can see that we have added bracing to stabilize the frame, we painted it white to match the other garden boxes/frames in the SFG and to preserve it a bit from the sun and weather. I was able to acquire some beautiful patio blocks that now sit under each leg of the frame to keep the end grain dry, which should slow the aging process of the wood. It also makes it easier to string trim around it without damaging the painted surface. (I remain committed to the low maintenance goal when I can.)

I will try and take a better photo of the Upside Down Frame later, I admit I was taking a "full view" photo of both gardens when I took this one and I realize now looking at it, that it really does deserve it's own photo.